Tag: blue loom

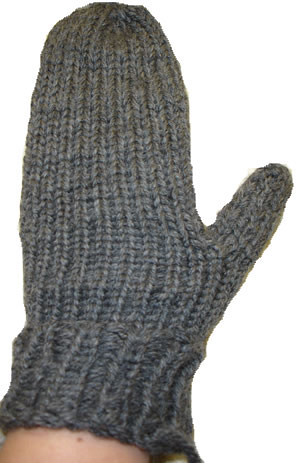
Mittens, pre-felting

1 Comment

image from www.flickr.com

I knit mittens on my blue Knifty Knitter loom, using the one loom mitten pattern. I changed the cuff by doing two rows of the garter stitch, plus I knitted a few extra rows. Because I used 100% wool, I then felted them.

They shrunk, a little. I'll post another picture soon.

They'll need another good wash/dry to get to the perfect size. The good thing about these is that I'm not really fond of them–if I lose one (which has been my habit this winter–I've lost one mitten and two gloves), then I'll have an excuse to make another pair, maybe in a better color. I bought one of those huge fisherman's wool skeins two years ago, and I've been using it for projects since then. Now, it's nearly gone. Hooray!

Ruffled Cuff Wrist Warmers (I dare you to say that three times fast!)

3 Comments


  • image from www.flickr.com
  • image from www.flickr.com
  • image from www.flickr.com
image from www.flickr.com

My office is making attempts to save energy, and one of the ways we're accomplishing this is to lower the heat during the winter. And it's cold in January! So, I decided to make myself some wrist warmers to help keep my hands warm while I'm typing away at my job.

I designed these after conducting a fruitless search for wrist warmers (or hand warmers, or fingerless mitts… whatever you call them) made in the round on the blue Knifty Knitter. Having made mittens with the blue loom in the round, I figured there would be many different ideas out there. I found a few patterns, but most asked for small or regular gauge looms. Some were knitted as a flat panel on the blue loom and then stitched into a tube, but I just couldn't find a fairly easy, knitted-in-the-round pattern. So, I made one up off the top of my head!

BIG WARNING: Because I'm not a terrific pattern writer, there may be very easy ways to make a similar item without following these directions. Be creative! And please share with me what you did to improve it!

BIGGER WARNING: I was uncertain how to do the opening for the thumb so I made it up. The next time I make these, I'll probably remove the stitches from pegs 1-5 (Row 31 in the pattern below) and place them on a stitch holder, and then, after the item is off the blue loom, I may transfer the stitches onto the flower loom and knit three or four rows of the garter stitch. Stay tuned for improvements!

~~~~~~~~~~~~~~~~~~~~~~~~~~~~~~~~~~~~~~~~~~

RUFFLED CUFF WRIST WARMERS

Make two.

Needed:

  • Blue Knifty Knitter Loom (24 peg large gauge loom)
  • Knitting hook
  • Crochet hook
  • Tapestry needle
  • Stitch makers to mark purling pegs (optional)
  • Yarn, approximately 125 yards: I used two strands of a worsted weight yarn (Patton 100% Merino Wool in Burgundy)

Notes:  

Instructions:

  1. Cast On. I use the cable cast on method.
  2. Rows 1-15 (CUFF): FS two pegs, PS two pegs. Keep up this pattern to create the cuff. Because the FS is a very snug stitch, the cuff looks ruffled when finished. Knit more rows for a longer cuff.
  3. Row 16-30 (BEGINNING OF HAND): FS.
  4. Row 31, PEGS 1-5 (THUMB OPENING): Lift loop from Peg 1 onto a crochet hook. Loop your working yarn over the hook, and pull it through Loop 1. Loop your working yarn again and pull through the loop. You now have one loop on your crochet hook. Lift loop from Peg 2 onto you hook and pull through the first loop. Loop your working yarn again and pull through the Loop 2. You now have one loop on your crochet hook. Move to Peg 3. Continue this pattern, creating a single chain, for Pegs 3, 4, and 5. Once Pegs 1-5 are safely crocheted, loop your final loop from your crochet hook onto Peg 6. You now have two loops on Peg 6, and no loops at all on Pegs 1-5.
  5. Row 31 (continued), Pegs 6-24: Knit off Peg 6. FS Pegs 7-24.
  6. Row 32, Pegs 1-5: You want to re-create new loops on your empty pegs. Use your working yarn and wrap Peg 1. Wrap Peg 1 a second time and KO. Wrap Peg 2. Wrap Peg 2 a second time and KO. Do this pattern for Pegs 3, 4, and 5. You will now have loops on all Pegs 1-5, and your working yarn is at Peg 6, ready to continue knitting in the round.
  7. Row 32 (continued), Pegs 6-24: FS Pegs 6-24.
  8. Rows 33-50 (TOP OF HAND): FS. NOTE: Knit as many rows as you'd like at this point. You want the mitt to reach to just below your knuckle area. Mine are a little too long.
  9. Row 51: PS
  10. Row 52-53: FS 2, PS 2. (Another option is: Row 51, PS. Row 52 FS. Row 53 PS.)
  11. Cast off. Use your tapestry needle to weave in any remaining threads.
  12. Finishing the Thumb: Use your crochet hook and yarn. Hook your crochet hook into one of the loops in the thumb opening, and crochet a single chain around the entire thumb opening, using up all the existing loops that border the thumb opening, one at a time. Be creative and make a fancy pattern if you so desire. If you find any open or weak areas areas after you're finished, reinforce these areas by either crocheting them or using some yarn and your tapestry needle and weaving in some reinforcing threads.

A not-quite-there-yet mitten

1 Comment
Mitten

I guess when you make something for yourself, you can be extra picky because you’re always checking to make certain it fits. This mitten does not fit!

I used the same ideas I used for my other set of blue loom mittens, only this time, I chose Paton 100% merino wool. I used a double strand, did a ribbed cuff and a gathered top. However, here’s what I don’t like about this poor mitten:

–The cuff is wider than the rest of the mitten. Because I chose the flat stitch for the majority of the mitten, the Purl 1, Flat Stitch 1 ribbing is too loose.

–I started the thumb too early. I need one more row before starting that thumb. now, it rides up a touch right below the thumb.

–The thumb is too snug/short. I should have used more pegs, plus it needed two extra rows.

–The top is too long. Now, here I’m getting picky. It’s only about one row too long.

So, there you have it. A failed mitten. Poor little thing. I intend on frogging it and starting over, making better notes this time. When I have a finished pair, I’ll do another post.

Big Bubba comes to visit

No Comments
Yarndog2
Yarndog3
Kittyicicle
Bigbunny

So, what brought yarn kitty and yarn dog out of the house on a winter day? In the past week we’ve had 30″ of snow, and yet there they were, both staring at something.

Could it be? Could it really be that they spotted Big Bubba, the harbinger of spring?

The kitty peered cautiously through an icicle. The dog bounded, but Bubba was too fast and got away! And least I think he got away.

Okay, enough silliness! What I really wanted to say is knitting bunnies is a good way to trigger spring. Even with all the snow, the sun is shining and the ice is melting the day after a winter storm. So, never again doubt the power of a pink, knitted bunny named Bubba.

I made this bunny using the same pattern as before, only this time I made him much bigger. I cast on 24 stitches on the blue loom and knit back and forth to create an 8.5″ square flat panel. I used the flat stitch and two strands of yarn–one Bernat Softee and one Moda Dea Dream. Because this bunny is so much larger than the other two, I had to guess how much bigger to make his ears. I cast on pegs 1-6 and purled the two middle pegs. I added two additional rows, and that’s all it took to make the ears. I did sew them on backwards so they had a floppier look.
Bubba is a little bit big, and although he’s cute, he’s no where near as cuddly as the little bunnies. Plus, his back legs look a little distorted.

But if Bubba can bring about spring, who can complain?

And what does yarn dog think about it all? Can she complain? “Nope,” she told me. “Bubba was delicious!”

(Just kidding.)